
|
https://ift.tt/2LTh1fo
Magix speeds up Photostory slideshow software and adds new effects https://ift.tt/2Ox4IUk
Imaging software developer Magix has released the 2019 version of its Photostory Deluxe slideshow application that it says is completely redesigned, easier to use and much faster than before. The company has used the engine from its Video Pro X movie editing program to run Photostory Deluxe, so it can now handle up to 16 tracks of effects to create more interesting presentations. Magix says that the process of creation is also much faster, and a new Effects Assistant makes it simpler to apply and control transitions, music and photo looks to the slideshow and the images it contains. The program offers 1500 effects, pieces of music and sounds for users to choose from, while 24 pre-set styles are available to jazz up your images. Users can also match the color and tonal atmosphere of two or more images to create a consistent feel to a slideshow, or import third-party pictures or movies to copy styles from external sources. Looks, styles and effects can be applied to single images or groups of selected images simultaneously to speed up the process, and now GIF files can also be used alongside high-resolution stills and 4K video. Shaky video can be stabilized using the system borrowed from the company’s proDAD Mercalli V2, and further updates to the program can be added to the application for free over the course of the first year. Magix Photostory Deluxe 2019 is available now and costs £59.99/ $69.99. For more information visit the Photostory pages on the Magix website. Press release MAGIX Releases New Photostory Deluxe – With Twice As Many Tracks For More EffectsWith the latest version of Photostory Deluxe, it is now possible to create even more impressive photo shows with significantly more effects thanks to twice as many tracks. Effect handling has never been easier – the new Effect Wizard makes it possible. MAGIX has equipped the new Photostory Deluxe 2019 with a 16-track program engine and noticeably simplified the application of effects. With the award-winning slideshow software, even large projects can now be realized quickly and easily. Innovations such as 24 pre-designed photolooks for 1-click colour enhancement or advanced image editing make every photo show a real eye-catcher in no time. Twice the tracks There are almost no boundaries to creativity when creating slideshows. The latest Photostory Deluxe now offers a total of 16 tracks for even more effects, because the program now features the powerful engine from MAGIX' professional video editing software, Video Pro X. Easier, quicker effect handling Photostory Deluxe contains over 1,500 effects, music and sounds for use when creating your slideshows. With the new Effects Wizard, these can be applied in just a few clicks. Never before has it been so much fun to explore the creative possibilities of the software. Digital slideshows can be designed in a no time – unique and full of effects. click photolooks and advanced image editing Photostory Deluxe users can now access "photolooks" to enhance images. With just one click, shots get a harmonic colour tone – matching the respective project. For more freedom of design there is the advanced image editing. From precise colour corrections with gradation curves to determining the optimal white/black values, everything is possible. All the highlights of the new Photostory Deluxe 2019 at a glance:
Price and availability: Photostory Deluxe 2019 –£59.99/ $69.99 Photography News via Articles: Digital Photography Review (dpreview.com) https://ift.tt/i0r8o5 July 31, 2018 at 06:02PM
0 Comments
https://ift.tt/2vsH4zU
Are You Excited? Nikon Mirrorless Camera Announcement Coming August 23rd https://ift.tt/2vaK4l9 New gear and rumors of new gear – it's the stream that keeps the gossip mill of the photography world turning. And when it's Nikon gear, that steady stream can often turn into a flood because, let’s face it, people love the Japanese optics manufacturer. Ending months of speculation, Nikon has confirmed that a mirrorless camera is on its way but details will have to wait. According to Nikkei, one of the largest and most trusted news outlets in Japan, those fans will have another reason to love Nikon this August 23rd when the company officially announces its new mirrorless device in full. You might be wondering what the big deal is since so many companies show off new gear around this time but, for Nikon, it is kind of a huge moment. 
Image via Irina Kostenich from Pexels.com. For those that may not hang on Nikon’s every word, this is a big deal as it is the company’s first foray into the mirrorless market, a highly competitive niche dominated by Sony and Canon. Details remain sketchy at the moment but press rumors speculate that all will be revealed in Tokyo on August 23rd, including the camera's release date, final specs, and, most importantly, pricing. In terms of performance, expectations range from everything plus the kitchen sink to a device barely capable of taking a picture of the comparable Sony unit, depending on who you ask. As with all rumors and hints of rumors, there’s a lot of bias swimming around out there, too. Analysts think the company is gunning for a release this Fall/Winter in time for the critical holiday shopping season and the company is throwing a ton of effort behind the product to meet this deadline. The new Nikon mirrorless will compete head-on with Sony and Canon as the company hoping to differentiate itself through “the best optical technology including lenses” according to Nikkei. Additionally, Nikon has scheduled fan events to take place throughout Japan beginning in September where many people think the company will take the opportunity to show off their new mirrorless units to their most devoted customers. You can watch a video from the company teasing the new camera here on YouTube. Are you excited? Leave your thoughts in the comments below The post Are You Excited? Nikon Mirrorless Camera Announcement Coming August 23rd appeared first on Light Stalking. Photography News via Light Stalking https://ift.tt/2kwTW5i July 31, 2018 at 04:00PM
https://ift.tt/2KeB42T
How to Shoot the ISS Flying Across the Face of the Moon https://ift.tt/2O07cJU
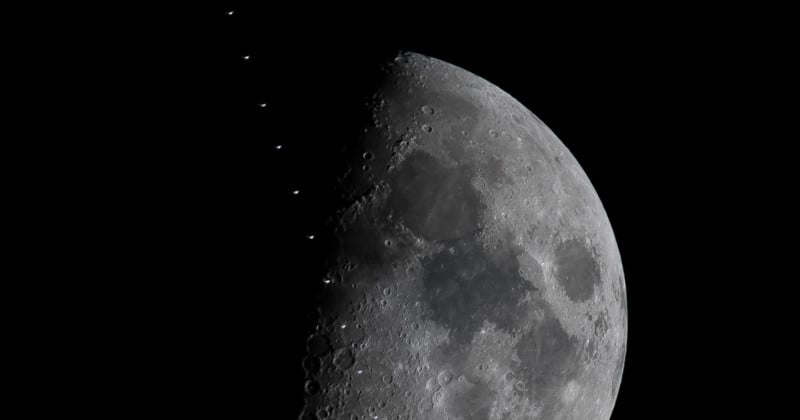
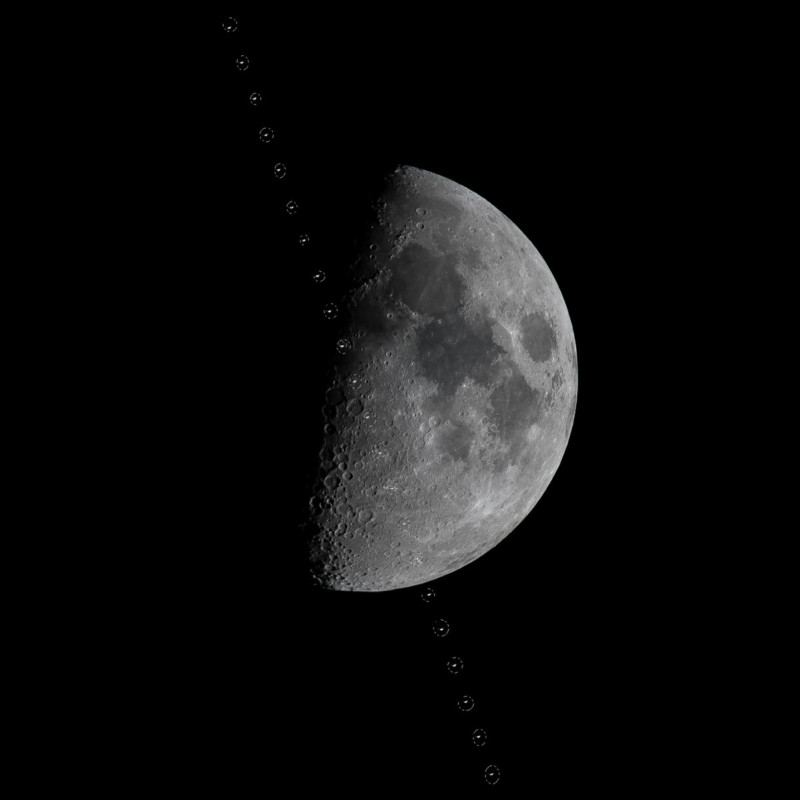
I’ve always been fascinated by the night sky, and one of my favorite things to look out for is the International Space Station when it passes overhead. It still boggles my mind that there are people up there, 200 miles into space. Perhaps they are looking down too. In this tutorial I’m going to show you how to photograph an ISS transit – in other words, photographing the ISS as it flies in front of the moon! For me, this is the holy grail of ISS photographs. I’ve had a few false starts in trying to capture this but finally I’ve got the photo I want, and I’m going to show you how I did it. The photo you see here is a composite of 22 consecutive frames illustrating the movement of the ISS across the face of the moon:
This whole sequence spanned just 5 seconds! Viewing The ISSThe International Space Station orbits 200 miles above Earth at a speed of 17,500 miles per hour. When the sun is below the horizon and the angle of reflection is just right, it is visible to the naked eye as a bright pinpoint of light moving across the sky. You can check when the ISS is visible using one of these websites Viewing the ISS does not require a telescope or any other specialist equipment. Just look up! Items You Need
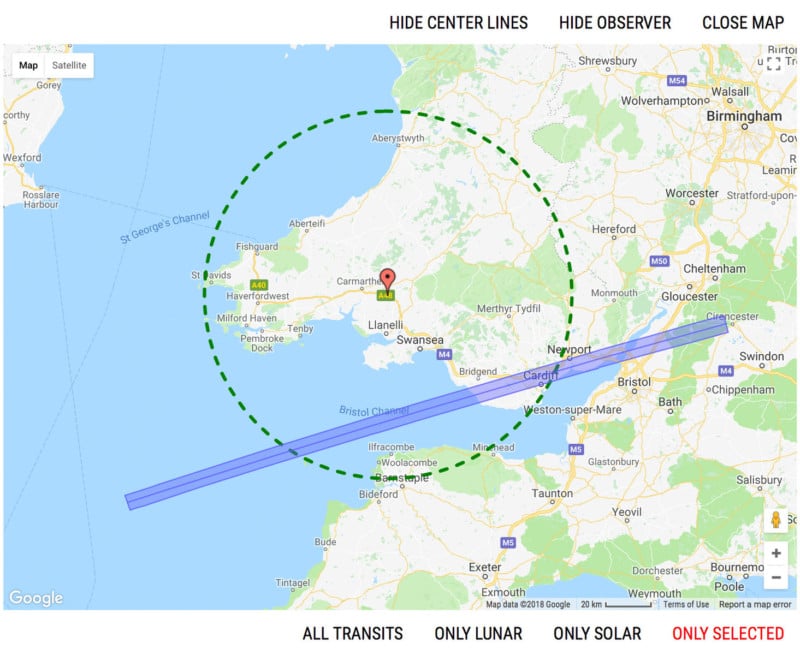
Finding When An ISS Transit Will HappenThanks to the incredible work of Transit Finder it is easier than ever to find out when the ISS transits the moon or sun at a viewing location near you. Choose your location from the map, define an acceptable radius (the default is set to 80km) and it will generate a list of passes.
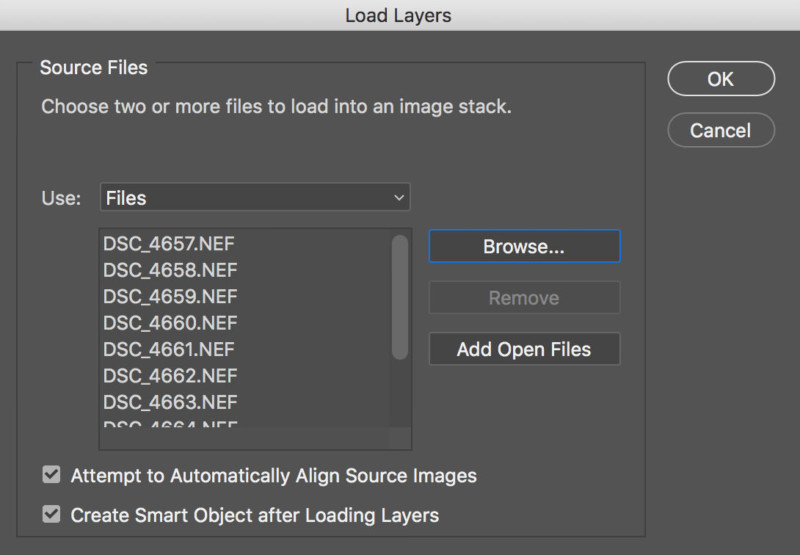
On May 22, 2018, there was a lunar pass which would be visible across the Vale of Glamorgan, Cardiff, and Newport in Wales. This is around one hour’s drive from my home, the weather forecast was clear, so I decided to attempt a shoot. I arrived 45 minutes early to ensure I had ample time to find a quiet spot to set up where I was unlikely to be disturbed, to take some test shots and have a quick practice run of the real shoot. Taking The ShotFirstly, double check the predicted transit time, and ensure the clocks on your camera and smartphone are properly synced. You don’t want to be scrambling to set up the shot because your timing was a minute off! Make sure your camera is set up for continuous shooting, or “burst mode”. Plug in your shutter release cable or remote control. Find your focus on the moon’s surface, then once you’re happy, turn off autofocus. Be careful as you move your camera or lens not to accidentally move the focus ring. One tip is to use a strip of electrical tape to hold the focus ring in place once you have manually focused. The moon moves quickly throughout the frame, so position it off-center, such that it will be moving into the center of the frame when the ISS arrives. Finally, decide upon your settings. This will vary from camera to camera and lens to lens, but it’s important to have a very fast shutter speed otherwise the ISS will be nothing but a white smudge. 1/1600 seconds is the minimum I’d recommend. Ultimately, the settings I used were: f/8, 1/2000 seconds, ISO 800. Though I advocate shooting RAW over JPG wherever possible, if you find your camera’s burst mode isn’t very quick, switching to JPG should yield far quicker results. Putting It All Together With PhotoshopThough it seems daunting at first, it’s really simple to put your images together using Photoshop. Go to File > Scripts > Load Files Into Stack Select all the images, and ensure the following boxes are checked: Attempt to automatically align source images Convert to smart object after loading layers
Reducing NoiseOnce complete you will have a stack of images grouped into a smart object. The last image of the series will be on top. Highlight this smart object in the layers panel, then click on Layer > Smart Objects > Stack Mode > Median This will drastically reduce the noise in your image and make your moon much crisper and detailed – check out this before and after comparison: 
Compositing The ISSDuplicate your smart object in the Layers panel, ensure it is the topmost layer, then click on Layer > Smart Objects > Stack Mode > Maximum This stack mode selects the brightest pixel from each layer in the stack and therefore shows the ISS most brightly. However it also carries through noise and hot pixels, so we need to mask those out. Masking For The ISSThere are a few ways to do this, but here is my preferred method. Click on your ISS layer in the Layers panel. Next, select the lasso tool from the toolbox. Set the feather to 4px. Holding down the shift key, which allows you to make multiple selections, lasso around each of the ISS spots in that layer. Once complete, it should look something like this:
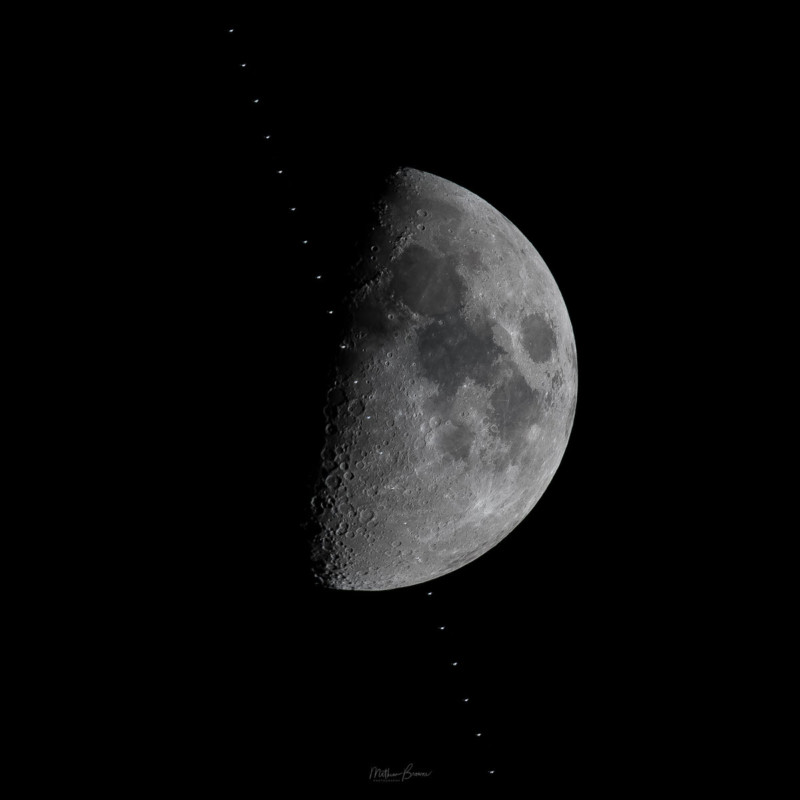
Click Select > Inverse then finally click the Add Layer Mask button at bottom of the Layers panel. This creates a mask that only shows the ISS image data, which is overlaid on top of the noise-reduced, sharp moon image that we already created. Job done! The Finished Product
I’m so pleased with how this photo turned out. Capturing an ISS transit has been high on my photography “bucket list” for some time but for all the effort and preparation, you still have to rely on a little bit of luck for the image to truly work. As I have learned before, a stray cloud at the wrong time can ruin the shoot, and it’s a huge disappointment to travel a long distance only to return without the photo you wanted. All those failed attempts fade in my memory though, as I’ve now bagged the image I’ve wanted for months if not years! About the author: Mathew Browne is a travel photographer from south Wales who specializes in architecture, landscapes, and cityscapes. He’s available for commercial work and portraits in the south Wales area and he also teaches fellow photographers via workshops, seminars and 1-to-1 tuition. You can find more of Browne’s work on his website, Facebook, Twitter, Instagram, Flickr, and 500px. This article was also published here. Photography News via PetaPixel https://petapixel.com July 31, 2018 at 02:18PM
https://ift.tt/2LQK0QQ
In case you haven’t noticed, smartphone cameras keep getting better and better. Not only do they take better still photos, but they also record high-quality video. Many latest generation smartphones are equipped with image stabilization, focus tracking, and the ability to shoot in 4K.
This is especially notable with the recent release of IGTV and social media platforms encouraging more video creation. With that in mind, it’s worth investigating how to use your smartphone to take better smartphone videos. As usual, it comes down to the tools you use. Here are several accessories worth investing in to take your smartphone videography to the next level. A Way to Secure Your Phone
Smartphones today are being built tougher, but they still have a sleek body that makes them easy to drop. To keep your phone more secure, consider getting one of these accessories. This will help you take sharper and better videos. Pop SocketIn case you’re not already hip to the Pop Socket, here’s why they’re so popular. 
Image courtesy of Pop Socket. These little devices look deceptively simple. They’re just a plastic backing that sticks to your phone and pops out to give you a better grip. This helps you hold your phone with one hand while taking selfies or shooting tricky angles. They are especially helpful while shooting video. But there are some problems with the Pop Socket. For one thing, they’re bulky. Even when retracted, the Pop Socket sticks out just enough to make it a hassle to stick your phone in your pocket or put it into your car’s cell phone holder. Secondly, Pop Sockets look about as cheap as they cost, at least in my opinion. This can ruin the aesthetic of the pricey phone you’ve invested in. Finally, these suckers are pretty permanent. Once they’re attached to your phone, they’re useless if you remove them. For that reason, I prefer using the next accessory to keep my phone secure. Black Rapid WandeR Bundle
Image courtesy Black Rapid. Black Rapid is known for their camera straps, but they also have a cool new product for smartphones. The WandeR Bundle is a nylon tether wrist strap that attaches to your smartphone’s case (above). You can also use the included TetheR-Clip to secure your phone to a bag or camera strap (see below). It’s a simple concept that is very well executed and will make it hard to drop or lose your phone again. 
Image courtesy Black Rapid. A Smartphone TripodLike any other camera, there’s a time and a place to use a tripod with a smartphone, especially when creating videos. The good news is that you don’t need a giant tripod for your smartphone, although you can certainly adapt any basic tripod for use with a cell phone using an adapter (more on that below). But if you want a more compact setup, consider getting a dedicated smartphone tripod. The Manfrotto PIXI EVO is a popular option, as is the JOBY GorillaPod Hybrid Mini. Both are small, yet sturdy enough to hold a smartphone or even a small mirrorless camera if needed. No matter what kind of tripod you end up with, make sure you get a cell phone tripod adapter to properly mount your device.
External microphoneMost smartphones have pretty good built-in audio recording features. But sometimes you need an enhanced audio solution. Note that for both of these microphones, you may need a smartphone audio jack adapter if you have a phone without a traditional audio jack. One of the best smartphone microphones out there is the Rode VideoMic Me microphone. It’s very compact and comes with a fluffy windscreen (also known as dead cat). To use it, simply plug it into your smartphone’s audio jack. It worked well with my Samsung Galaxy S8 but didn’t work at all with the Google Pixel. The reason is the location of the audio jack. On the S8, it’s located on the bottom of the phone, on the opposite end of the cameras. The Pixel’s audio jack is located on top, next to the camera. Thus, the microphone was in the shot both with and without the windscreen. So check the audio jack’s proximity to your camera before investing in this mic. Another type of microphone you may need is a lavalier (or lapel) mic. It is placed in close proximity to the speaker’s mouth to isolate their voice from environmental noise. Lavalier mics are generally wired, meaning they can be difficult to use when plugged directly into your video recording device. So the most convenient setup is to record your visuals with one camera, and record audio with a lavalier mic plugged into a smartphone. You’ll need an audio recording app to do this. A top of the line lav mic option is the Rode smartLav+, or the more affordable Stony-Edge Simple Lav. Note that sound quality typically corresponds with price, but it truly depends on your budget.
Smartphone gimbalMany smartphones come with built-in stabilization that will help minimize or remove shake from your videos. However, you still need an extra tool if you want buttery smooth, cinematic video footage. The simplest video stabilization tool is an electronic handheld gimbal. There are two main gimbals out there worth considering, and they’re very competitive in terms of features and price. One is the DJI Osmo Mobile 2, and the other is the Zhiyun Smooth Q. I’ve been using the Smooth Q for the past few months and have been blown away by how much my smartphone video quality has improved. Best of all, a gimbal is easy to use and quite affordable for the features it offers.
Extra PowerWhile smartphone battery life keeps gradually improving, it’s still a good idea to bring a portable cell phone charger with you. There are tons of external batteries on the market, but Anker is by far one of the more reputable brands. In particular, the Anker PowerCore 10000 is a compact, efficient, external battery. It can charge either your smartphone or electronic gimbal or both at the same time. Just be sure to charge the battery ahead of time and bring the right cables. Over to YouIn short, you don’t need a lot of tools to start using your smartphone to make better videos. However, if you add these tools to your kit, you’ll be well on your way to producing more professional-looking videos. Do you have any smartphone video accessories? Let us know your essential tools in the comments below! The post Equipment List for Making Better Smartphone Videos appeared first on Digital Photography School. Photography via Digital Photography School https://ift.tt/29wB9CX July 31, 2018 at 02:04PM
https://ift.tt/2v1SsTW
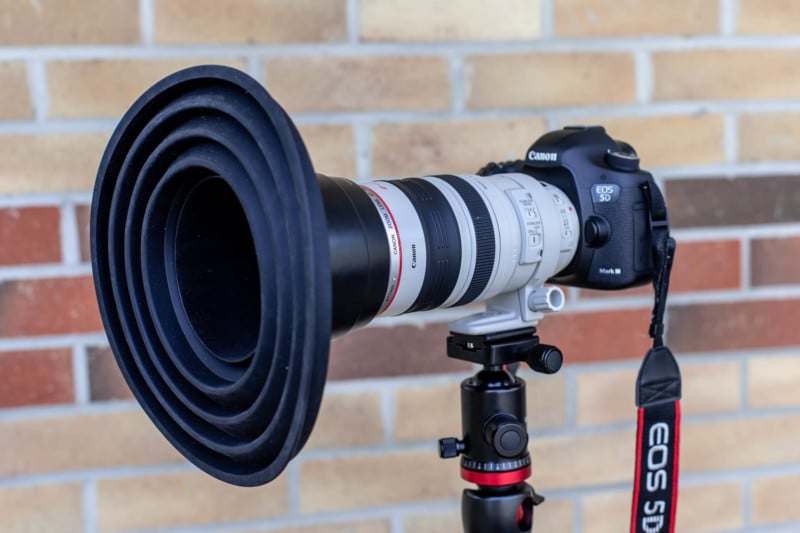
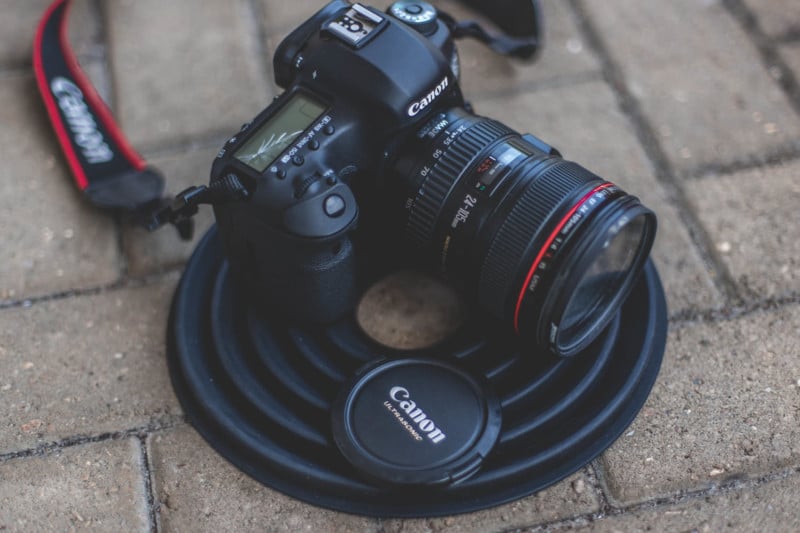
The Ultimate Lens Hood Lets You Shoot Reflection-Free Through Glass https://ift.tt/2OyH1eD
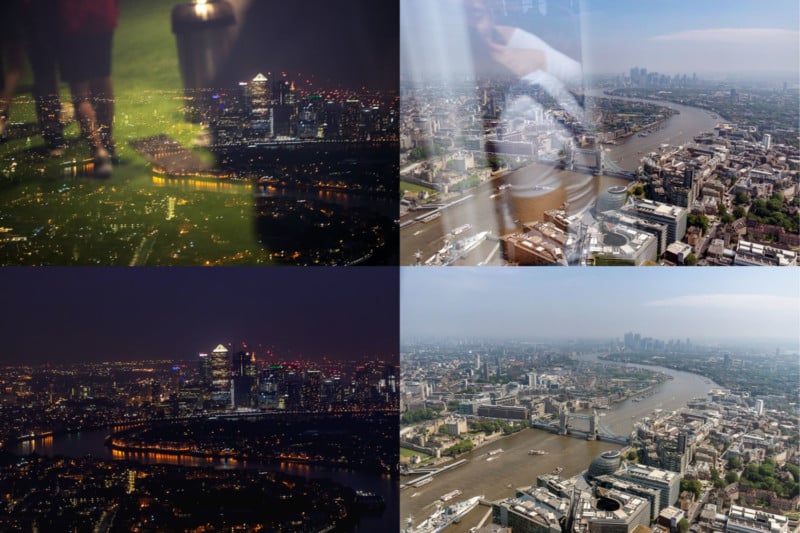
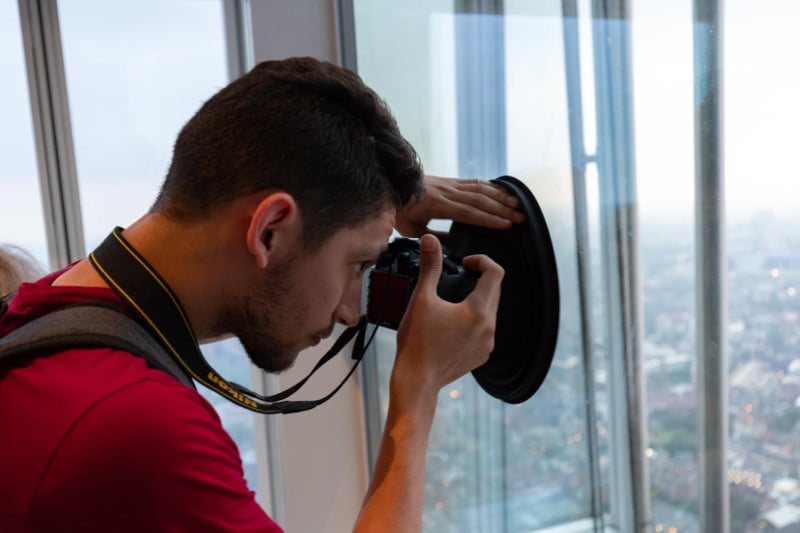
The Ultimate Lens Hood is a new camera accessory that helps you shoot through glass without reflections. It’s a versatile collapsing silicone cone that can stretch to fit all kinds of camera lenses. Creator Josh Smith says he got the idea for the ULH during a trip to Japan back in 2015 when he found that the photos he had taken from inside the many observation decks and towers he had visited had been ruined by reflections.
So, he created a silicone product to help block light from bouncing off windows.
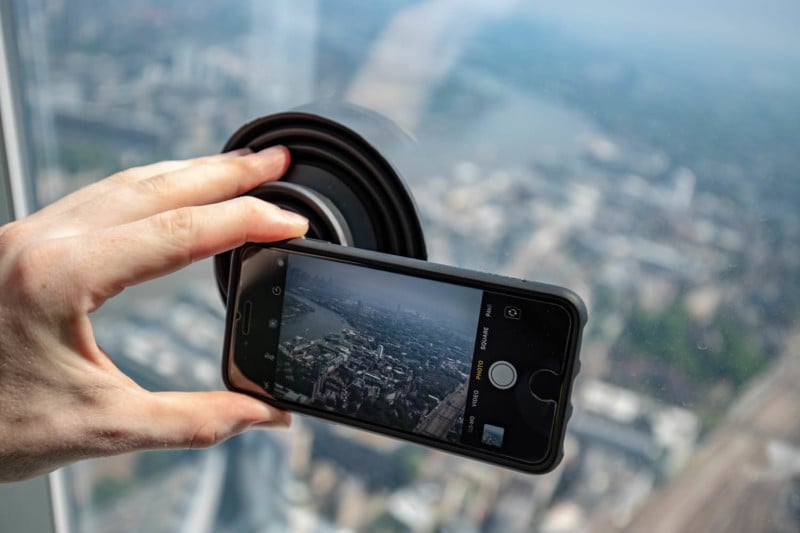
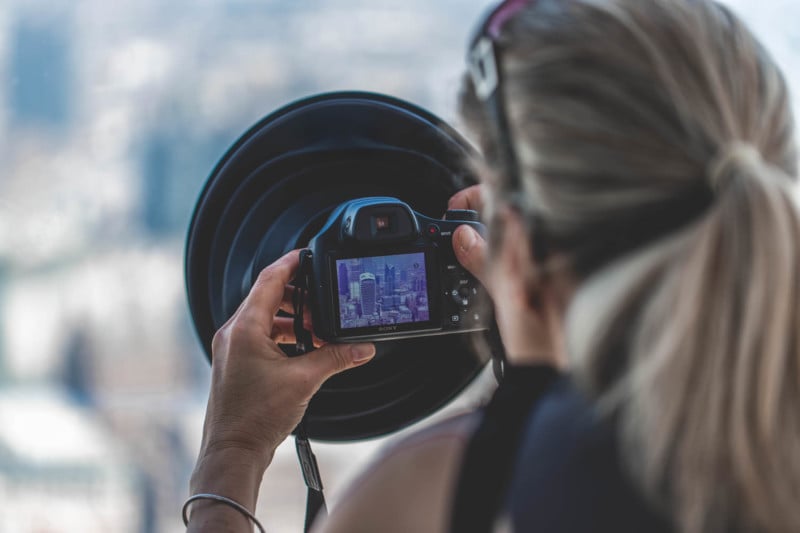
Here’s what he view through the camera as you press the ULH against the glass to block off surrounding light rays: The standard ULH was designed for DSLR and mirrorless camera lenses, stretching to fit the barrels of even large telephoto lenses (60mm diameter and up). There’s also a ULHmini that’s designed for smartphone lenses and smaller digital cameras (30mm to 60mm).
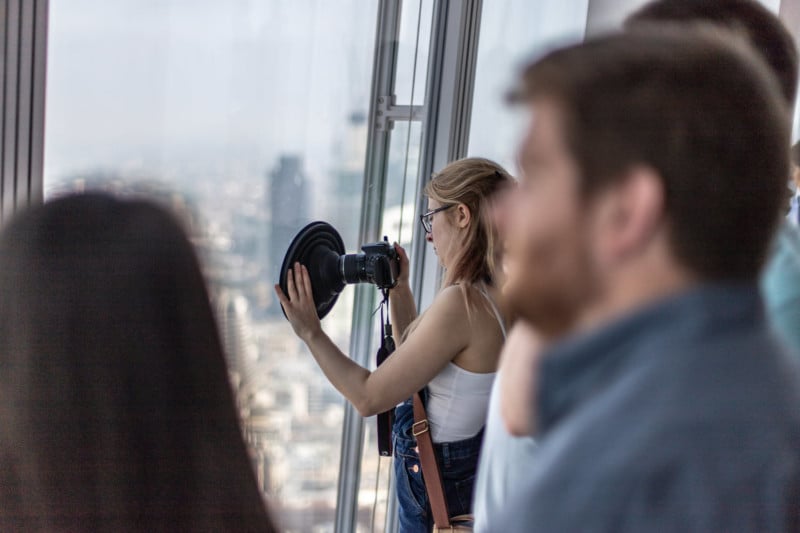
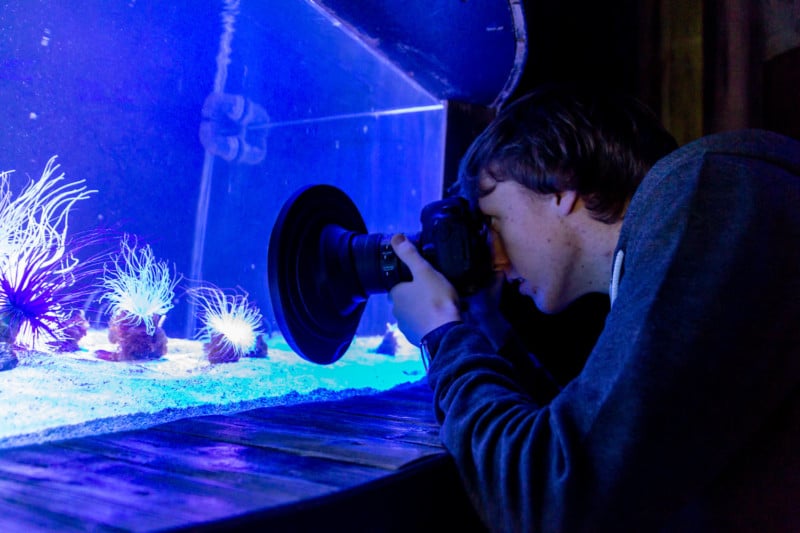
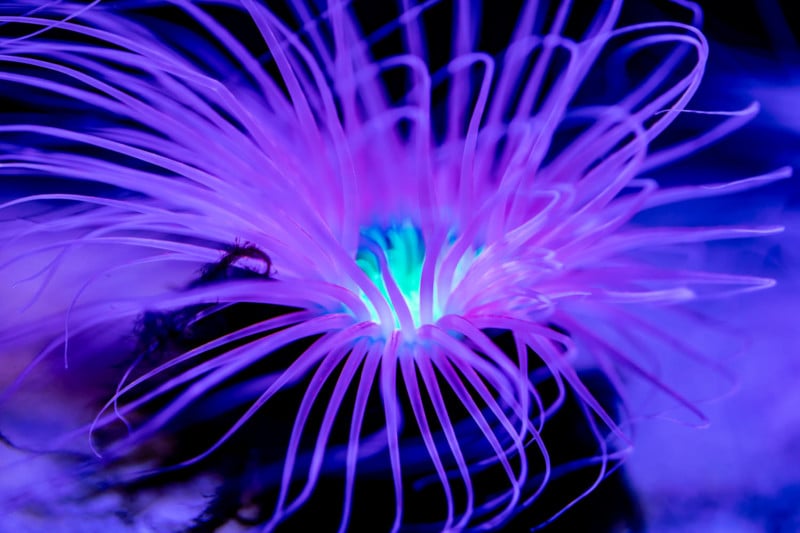
The flexible nature of the ULH allows you to move the camera around and shoot at different angles while the lens hood is pressed firmly against the glass you’re shooting through. Here’s are some examples of what the ULH can help you shoot:
Attaching the ULH backward onto your lens allows it to serve as lens protection, keeping things like water, snow, mud, sand, dirt, and dust from hitting your lens body. An existing competitor to the ULH is the LENSKIRT flexible lens hood, which uses a non-silicone material and has suction cups for mounting to glass. Since it’s more rigid, the ULH doesn’t need to be mounted to glass, allowing photographers more freedom of movement while using it.
Here’s an introduction to the Ultimate Lens Hood by Josh Smith: Smith is crowdfunding the Ultimate Lens Hood on Kickstarter, where it blew past its initial ~$10,000 goal in just a few days and currently sits at nearly $40,000 raised from nearly 800 backers at the time of this writing. A pledge of ~$20 and up can earn you one of the first ULHminis, and a pledge of about $40 can score you a full-sized ULH if/when the product successfully ships (Smith is aiming for October 2018). Photography News via PetaPixel https://petapixel.com July 31, 2018 at 01:44PM
https://ift.tt/2AsDUSn
 We were to have already seen an official announcement for the DJI Mavic 2 Pro drop, as it was originally scheduled to be announced on July 18, 2018. For whatever reason (rumored to be production issues), DJI delayed the announcement. It’s now rumoured that the announcement will come in September ahead of Photokina. There are going to be two versions of the drone, one being the DJI Mavic 2 Pro and the other being teh DJI Mavic 2 Zoom. The zoom drone will have a 2x optical zoom of 24mm-48mm, which will used a built-in dolly zoom effect. We knew earlier in July that there would be two version of the Mavic 2, thanks to these leaked photos. But thanks to Argos we have even more details about what to expect from the new DJI drones. Key Specifications:
The other big update for the Mavic Pro line will be the use of a larger 1″ CMOS sensor. Comment on the forum here (Temporary Link) Photography via Canon Rumors https://ift.tt/xgIh23 July 31, 2018 at 07:37AM
https://ift.tt/2KibB8G
 Latest Addition to PowerShot Family Provides a Multitude of Features for Entry-Level Photographers MELVILLE, N.Y., July 31, 2018 – Whether your family is always on the go, you are an up-and-coming vlogger or you enjoy posting photos to social media, a compact digital camera capable of producing high quality images is a necessity. Today, Canon U.S.A., Inc., a leader in digital imaging solutions, introduced the new PowerShot SX740 HS digital camera boasting a 40x Optical Zoom Lens (equivalent to 24-960mm), a 20.3 Megapixel* CMOS imaging sensor and 4K video capabilities, which is a first in the PowerShot series. “We remain committed to incorporating the latest technologies and innovations into Canon products that help meet the needs of our customers,” said Kazuto Ogawa, president and COO, Canon U.S.A., Inc. “As we continue to grow the popular PowerShot SX-series, we are excited to offer more imaging solutions that encourage visual storytelling.” Featuring a DIGIC 8 Image Processor, dual-sensing image stabilization, automatic image transfer, feature assistant and a 3.0-inch LCD screen that rotates 180 degrees, the PowerShot SX740 HS helps make transitioning away from smartphone photography fun and easy. With high-speed continuous shooting up to 7.4fps, an ergonomic design and built-in Wi-Fi®** and Bluetooth®*** technology, you can easily capture life’s greatest moments with the PowerShot SX740 HS. Availability and Pricing The PowerShot SX740 HS will be available for purchase in late August for $399.99****. To purchase this product or for more information about Canon U.S.A products, visit http://shop.usa.canon.com/. Photography via Canon Rumors https://ift.tt/xgIh23 July 31, 2018 at 06:45AM
https://ift.tt/2mX65z7
Such a great tip from Benjamin Warde – if you’re not using Match Exposure, I’ll bet you will after watching this video! Give that one a try — it works really well. Here’s to a kick-butt Tuesday! Best, -Scott The post The “Match Exposure Trick” I’ve Been Showing On My Seminar Tour appeared first on Lightroom Killer Tips. Photography via Lightroom Killer Tips https://ift.tt/2sh0aZ8 July 31, 2018 at 03:30AM Compact Canon PowerShot SX740 HS offers 40x zoom lens and 4K video https://ift.tt/2Ke3R7L 
1
Compact Canon PowerShot SX740 HS offers 40x zoom lens and 4K videoCanon's new PowerShot SX740 HS is an ultra-compact long-zoom camera that replaces the SX730. As with that camera, it features a 24-960mm equivalent F3.3-6.9 lens, 20MP 1/2.3" BSI-CMOS sensor and flip-up LCD. The SX740 gains Canon's latest processor (Digic 8), which brings with it UHD 4K video capture and 7.4 fps burst shooting with continuous AF. The camera also features Wi-Fi with NFC and Bluetooth, with the latter providing the ability to automatically transfer images to both mobile and desktop devices. The PowerShot SX740 HS will be available in silver or black at a list price of $399. Canon PowerShot SX740 HS specifications
Support DPReview. Shop with View Comments (1) The LG G7 ThinQ is a flagship device with a dual camera that departs from the norm: rather than the usual tele/wide combo, it offers wide and super-wide angle lenses. While it doesn't produce class-leading image quality, it's a solid option if you favor wide-angle shooting. The Wandrd Prvke (pronounced 'provoke') is one of the best-looking and most functional camera backpacks on the market. The Fujifilm X-T100 is the company's least expensive X-series camera to include an electronic viewfinder. It shares most of its guts with the entry-level X-A5, including its hybrid AF system and 24MP sensor and, unfortunately, its 4K/15p video mode. Dials and sliders and buttons, oh my! This modular set of editing controls hopes to improve your photo editing workflow – for a price. The Sony RX100 VI is a spectacularly capable travel camera, combining a flexible zoom range with impressive autofocus. But there's no getting around the fact that it's an expensive camera, and a longer lens comes with certain trade-offs. Read on for our full analysis. The instant camera market is heating up, and with four formats and 15+ cameras to choose from, we felt it was high time to examine them all and pick our favorite. Whether you're hitting the beach in the Northern Hemisphere or the ski slopes in the Southern, a rugged compact camera makes a great companion. In this buying guide we've taken a look at seven current models and chosen our favorites. What's the best camera for a parent? The best cameras for shooting kids and family must have fast autofocus, good low-light image quality and great video. In this buying guide we've rounded-up several great cameras for parents, and recommended the best. What's the best camera for shooting landscapes? High resolution, weather-sealed bodies and wide dynamic range are all important. In this buying guide we've rounded-up several great cameras for shooting landscapes, and recommended the best. What’s the best camera costing over $2000? The best high-end camera costing more than $2000 should have plenty of resolution, exceptional build quality, good 4K video capture and top-notch autofocus for advanced and professional users. In this buying guide we’ve rounded up all the current interchangeable lens cameras costing over $2000 and recommended the best. Photography News via Articles: Digital Photography Review (dpreview.com) https://ift.tt/i0r8o5 July 30, 2018 at 11:04PM
https://ift.tt/2mUvUjn
Nissin MG10 hammerhead flash goes on sale https://ift.tt/2Aq1Llp  The MG10 hammerhead flash unit from manufacturer Nissin will be available from the end of this month priced $599. The handle-mount flash is designed to be used both attached to the camera and as a studio-type head, and has a maximum guide number of 262ft/80m@ ISO 100 and with the zoom set to the 200mm position. When connected to the camera via the company’s 2.4Ghz Nissin Air System radio communication the flash can be remotely triggered and controlled, and the zoom head will automatically synchronize with the focal length of the lens in use. The head can adjust to cover focal lengths of between 24mm and 200mm, while an additional diffuser panel expands the coverage to 18mm. Using the Air system the flash unit can be used to trigger the camera too, as it has a shutter release button built-in to its grip.
A modeling light is included to assist pre-visualization, and every unit comes with a quick release L mounting bracket, AA magazine, a ball head and a filter holder. Via the Nissin Air System the MG10 can wirelessly operate with up to eight groups of other flashes in TTL and M modes, and a MicroSD card slot is designed to allow users to update firmware themselves when improvements are released. For more information see the Nissin website. Press release The ultimate power – Nissin MG10An advance NAS 2.4Ghz Wireless strobe for on-camera and studio shoot Nissin Japan Limited (Chairman Mr. Goto Chikara) proudly announces the MG10, an advance NAS (Nissin Air System) 2.4Ghz Wireless strobe for both on-camera and studio shoot, available in the bottom of Jun 2018 The MG10 is a high power (80GN, 165 w/s) advance strobe in the N.A.S., Nissin Air System*1. The flexible hand grip arrangement which can be used both left and right side with height level adjustment. Every single MG10 included a quick release mounting magnesium “L” bracket, AA battery magazine, Li-Ion battery magazine, ball head, filter holder and wide-angle diffuser. There is a shutter release button on top of the handle and standard adapter screw under the flash head for using in the studio shooting. It also fully supports Air 10s and Air 1 commander wirelessly. Patented design – magnetically contacted motorized zoom head *2 The removable external motorized zoom allows MG10 to zoom 24 ~ 200mm and 18mm with diffuser. It can also control in manual and auto synchronize lens focal length via Air 10s. Fast recycling time with full power When two Li-ion batteries with PS8, type 26650, the recycling time is only 1.5 seconds (500 flashes with 5000mAh batteries or higher). With 8 AA re-chargeable batteries the recycle time is approximately 3.5 seconds*3. High power modelling light (LED) The powerful modelling light without zoom head which is perfect match for applying to the studio usage. Set your group of strobes free – The Open Mode allowing multiple Air10s pair to the same group of strobes The “open mode” allows for multiple Air10s units to pair the same group of the MG10 strobes which means the need to re-pair devices is eliminated. Even if cameras are changed, the same settings can be used as the shoot continues. This convenient functionality allows multiple cameras and commanders to share a same group of NAS strobes (MG10). New wireless remote shutter replaces the camera shutter button With the wireless remote button from flash, signal can transfer through the shutter cable socket (2.5mm) on Air 10s and then go to the camera. It is more flexible for holding MG10 as shutter release to moving around during shooting. Independent control of maximum 8 groups MG10 supports the basic and advance groups in maximum 8 groups via Air 10s. The basic group which is independently control the exposure setting in TTL or M mode. The advance group which is control both TTL and M mode in the mixing setting. Sustainable performance – easily updated via a Micro SD card slot The MG10 equipped with a Micro SD card slot that allows user to update the device easily by themselves. Nissin plans on putting a Micro SD card slot on all future strobes and commanders. Photography News via Articles: Digital Photography Review (dpreview.com) https://ift.tt/i0r8o5 July 30, 2018 at 07:16PM |
Categories
All
Archives
November 2020
|
|||||||||||||||||||||||||||||||||||||||||||||||||||||||||||||||||||||||||||||||||||||||||||||||||||||||||||||||||||||||||||||||||||||||||||||||||||


 RSS Feed
